# Flow builder
## Flow Builder Overview
This section will give you an overall idea about how to use the GoChat flow builder. You can open a flow and try side by side when you learn it.
**IMPORTANT:** 💁 Please make sure you go through every detail on this page before you start building bots.
#### Flow, Sub Flow and Step
#### 
#### Flow Type
To begin with, you need to create a flow. Currently, GoChat provides you with 11 types of flow:

#### Sub Flow Type
Flow consists of sub flows. There are 3 types of sub flow:
Sub Flow
| Sub Flow | Usage |
| ----------------------------------------------------------------------------------------------------------------------------------------------------------------------------------------------------------------------------------------------- | ------------------------------------- |
|  | general sub flow, varies in flow type |
|  | call / trigger background tasks |
|  | process repetitive tasks |
#### Step Type
Sub Flow consists of steps. There are 8 types of steps:
Step
| Step | Usage |
| ----------------------------------------------------------------------------------------------------------------------------------------------------------------------------------------------------------------------------------------------- | ----------------------------------------------------------------------- |
|  | Send a message: display information |
|  | Question: ask question and wait for user input |
|  | Action: process data and tasks via integrations, APIs, notifications... |
|  | Condition: go different steps depend on conditions |
|  | Split: go different steps depend on probability |
|  | Send Email: send full email instead of short email notification |
|  | Goto: jump to a step or sub flow rather than using a line connector |
|  | Output: define output for the function flow |
Note
The differences among different types of flow are Flow Setup, Send Message Step and Question Step. Each channel has its own limitation of message types. For example, you can display a product gallery in Facebook Messenger while the SMS channel doesn't support that.
#### Publish Version & Draft Version
In GoChat, each flow has a Publish Version and a Draft Version.
* Publish Version\
your bot talk to clients using the publish version.
* Draft Version\
any editing of steps will be saved automatically to the draft version. you can edit your flow without influencing the bot and test the draft version before you "Publish".
#### From Publish Version to Draft Version, 1 way:
* click "Edit Flow" on the upper left/right corner of the flow to enter the draft version

Note
You must enter Draft Version before you edit a flow.
#### From Draft Version to Publish Version, 3 ways:
* click "Publish" to save your draft to a new Publish Version
* discard changes and revert to the newest Publish Version
* keep draft and switch to Publish Version (by doing this, you can have a look at your publish version and when you click edit and come back, your draft is still here)

Note
Don't worry if you accidentally quit during your editing, the system will keep all your modifications in Draft Version. So when you come back, simply enter Draft Version again and you can see your modifications remain intact.
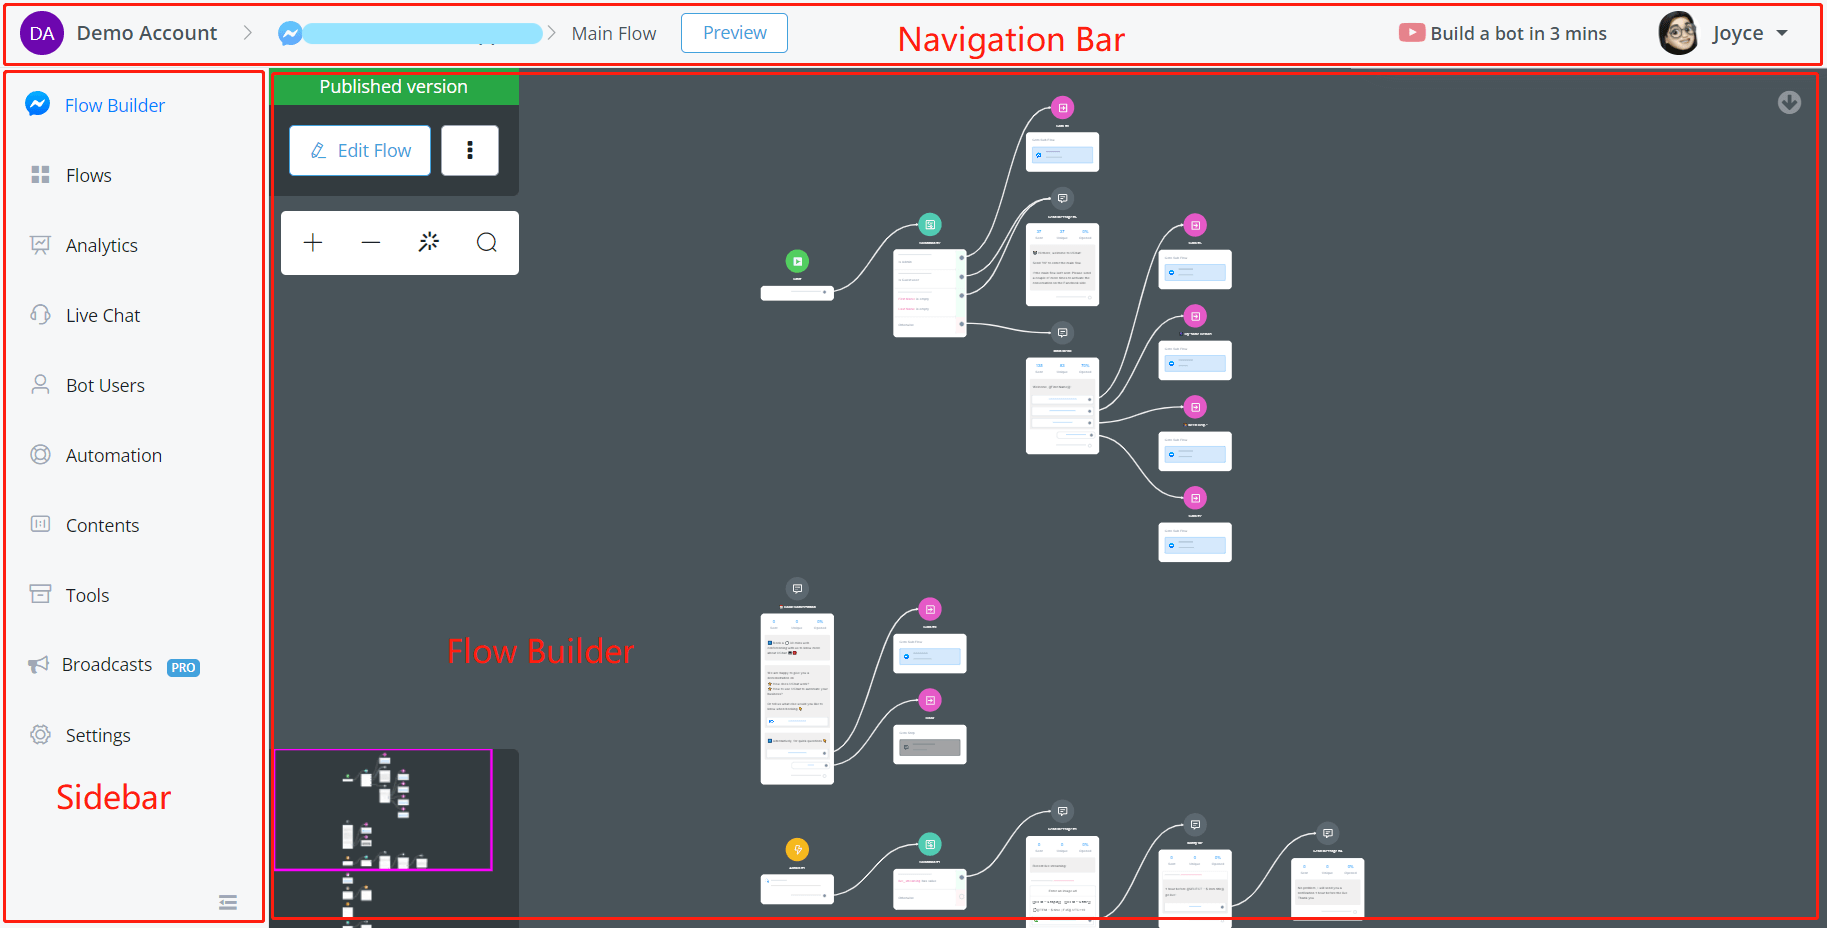
#### Navigation Bar, Sidebar & Flow Builder
TIP: You might want to create a flow first, then open the flow side by side when you read the following instruction (Facebook flow used as an example).
After entering a flow, this is what you will see:
#### Navigation Bar
On the top, there is a navigation bar. From left to right there are:
| Part | Usage |
| ------------------------- | --------------------------------------------------------- |
| "Demo Account" | current workspace, click to go back to GoChat dashboard |
| "gochat.hyppo.io Support" | flow type and flow name, click to go back to "All Bots" |
| "Main Flow" | current sub flow |
| "Preview" | preview the current subflow from the Start Step |
| "Build a bot..." | tutorial video widget |
| "Joyce" | current user, click for user settings, support and logout |
Preview Feature
Please note that "Preview" feature is not supported in all channels. Channels support "Preview": Facebook, Telegram, WhatsApp, Line and Viber. For channels without Preview, search "talk to bot" in the documentation.
#### Sidebar
On the left-hand side, there is a sidebar. From top to bottom there are:
| Section | Usage |
| ------------ | ------------------------------------------------------------------------------------------------------------------------------------- |
| Flow Builder | build subflows here |
| Flows | manage all your subflows |
| Analytics | bot data analysis |
| Live Chat | inbox for all the conversations, make a human reply here |
| Bot Users | manage bot user profile. import, export, search or delete bot users |
| Automation | manage keywords, sequences, triggers and comments |
| Contents | manage custom fields, tags, OTN, personas, user menus and customer feedback |
| Tools | manage error logs, draft version tester, bot admins, widgets, multiple language and shortcuts, Facebook Ads, inbound webhooks |
| Broadcasts | send/manage broadcasts |
| Settings | (some are owner only) manage bot users limit, Facebook greeting text, chat widget customization, ice breakers and authorized websites |
Note
Features in Automation, Contents, Tools and Settings can be different from channel to channel. In Settings, usually owner can see all the settings like bot user limit while admin and member only see part of them.
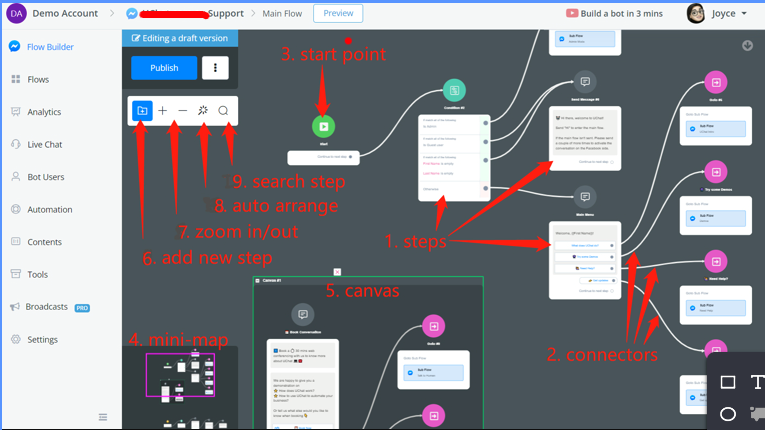
#### Flow Builder
Apart from those in the above screenshot, there are a couple of more tips for using the flow builder:
  
#### Flow stats
To see the flow stats on the sent messages, go to a node and lick on the Metrics section to view the stats of all the nodes.
You have to be on the published version of the flow to see the stats on each of the nodes. As you can see in the image below, the message #15 was sent 69 times in the last 30 days by 69 unique users.

#### Change Themes
Before you start, you can pick your favourite theme by clicking "Change Theme":

choose one of them and "Apply Change".

#### Hide Mini-map or Tooltips

Mini-map is useful when you need to move your workspace in some situations. For example, when you click and drag inside a canvas, you are moving the canvas as a whole instead of everything in the builder:

You can hide the mini-map by clicking the "Hide Flow Overview" option.
With tooltip, you can see description for every feature you see in the flow builder like this:

The tooltip includes a title, description, image, video link and documentation link. It is friendly to new users. For users who are already familiar with the system, you can choose to disable the tooltip by clicking the "Hide Flow Tooltips" option.
#### Basic Operations to Build Flows
#### Edit Step:
Click on a step to edit it, "Edit Panel" will show next to the sidebar.

Click step name to edit it. You can choose the next step at the bottom of the edit panel or drag connectors from the circle to the tile of another step.
#### Connect Steps:

Create a new step or choose an existing one to be the next step. For dragging connectors, see below:
 
TIP: When you choose an existing next step, a line will be connected from the current step to the next. Too many lines can be messy, get a Goto step to help you organize! In a Goto step, you can nominate the next step without creating a line connector.
#### Select Multiple Steps (Move to Canvas/Sub Flow)
We've just learned how to move the builder by clicking and dragging. For selecting multiple steps, it's a bit similar. Hold the Shift key then click and drag to cover the steps you would like to select:

Alternatively, ctrl + click them one by one:

The selected step has a green border. After selecting multiple steps, click "Create New Canvas" to organize these steps in a canvas box, or move them to an existing sub flow. To delete multiple steps, hit the "delete" button on your keyboard after choosing several steps:

Delete on Mac
On Mac OS computer, hold fn and hit Delete to remove steps. Or use the "Delete Selected button in the editing panel.
TIP: The green start point is the entrance of a sub flow. It can't be moved to other sub flows or deleted even you include it in a group of steps.
#### Copy and Paste Steps
After you select a step or multiple steps, use Ctrl + C to copy and Ctrl + V to paste it to:
* the same subflow
* different subflows in the same bot/flow
* different bots/flows but the same channels (associate custom fields will be created automatically)
* different channels (unsupported features will be removed)
TIP: Please note that you can only paste ONCE. Copy again for another paste. This is to prevent bulk pasting which can quickly blow up the flow.
That's all about it for Flow Builder Overview!! 🎉 Try building your first flow now. 😎
## Steps
### Send Message Step
After creating your first flow, open it, click "Edit Flow", have your bot side by side and here we go! 😆
Let's take Facebook as an example. Other flows share similar processes where the main difference is message type.

A few simple steps to send out your first message:
1. click the green start point
2. in the edit panel, "Select Next Step"
3. choose "Send Message" step
4. click the "Send Message" step
5. click text type message
6. enter your message
7. "Publish"

That's it! Let's test!

Click "Preview" from the navigation bar and "Open the flow in Messenger". Click "Get Started" if it's the fist time you talk to the bot.
Preview Feature
Please note that "Preview" feature is not supported in all channels. Channels support "Preview": Facebook, Telegram, WhatsApp, Line and Viber. For channels without Preview, search "talk to bot" in the documentation for guidance.

Congrats! Your bot is working now. 🤖🤖
Let me show you some more details about Send Message step. These are the message type in common for all/some of the Channels. Check by type below:
#### Send Text / Variable
#### 
GoChat has integrated with Grammarly to help you get your expression perfect.

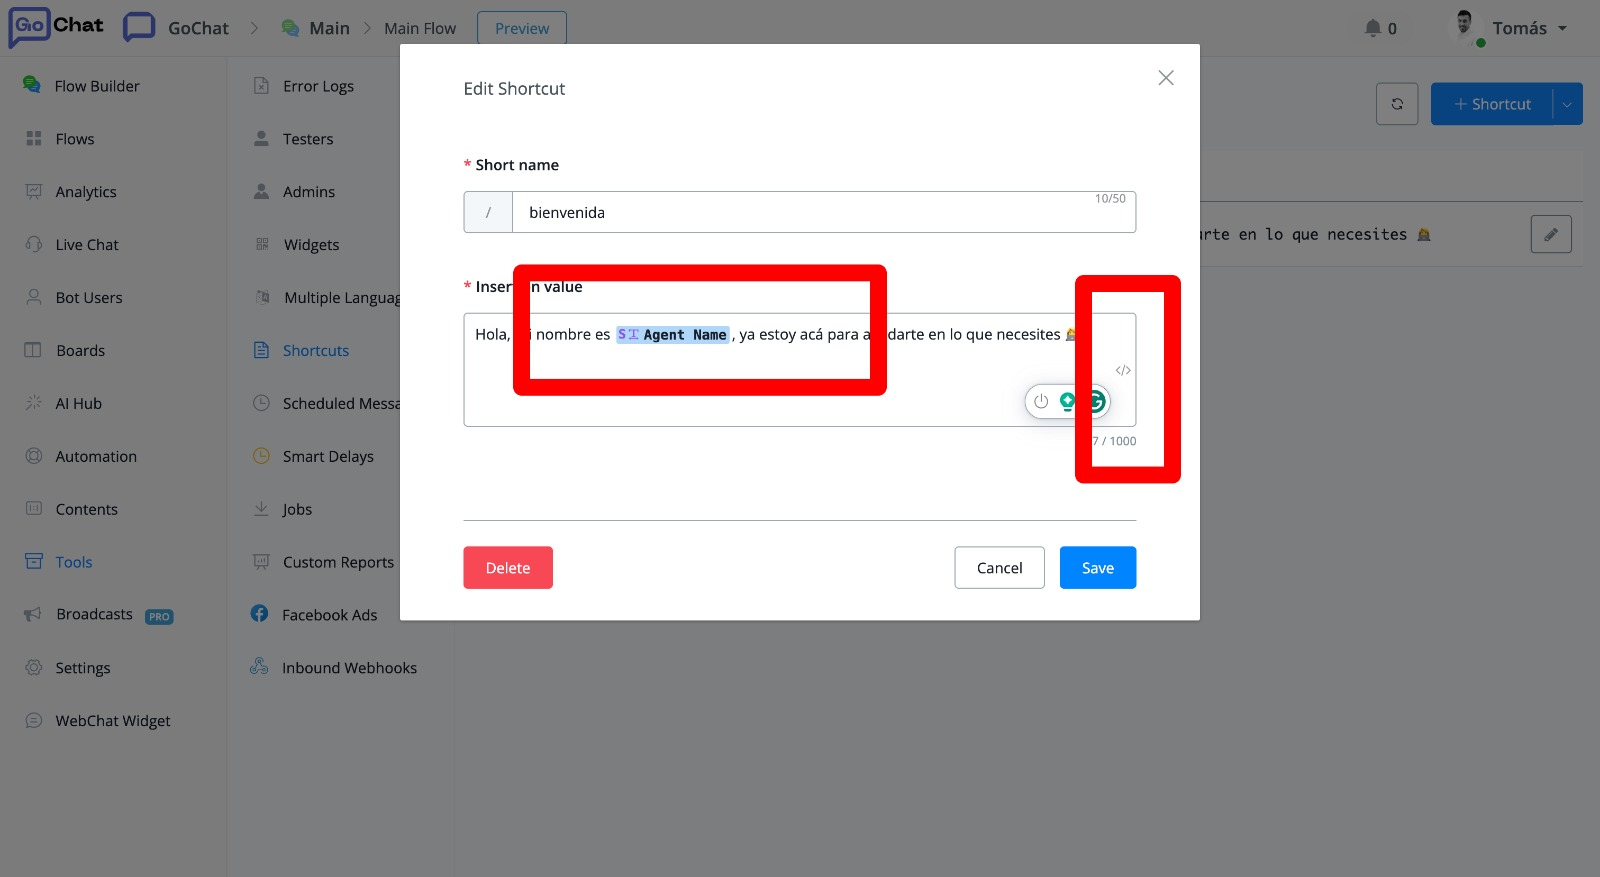
#### Insert Custom Field Value and Emoji
Wherever you see "\", you can insert emojis or variable values to the text.

Or simply type "{{" to call the field list:

#### Send Image / Audio / Video / File
There are 4 ways in total:

* upload from your computer (size limited)
Media Type
Maximum Upload Size
* video: 10MB
* audio: 5MB
* file: 5MB
* others(e.g. image)
* 2MB
#### Use Media from an URL link (RECOMMENDED)
You can search pictures online and copy their direct URL links. But this direct link might change. Alternatively, you can upload photos to your server or other third-party photo storages like imgur.com, then get your direct URL links from that. Direct URL link means the link is pointing to a specific photo, not a website, ending with .jpg or .png, etc. Take the link in the above picture for an example.
* search from GIFs gallery\
GoChat provides you with a GIFs gallery, you can search what you need here.
* from Library\
Library is the place you can see all the photos, GIFs, audios and videos you have uploaded before. So that you don't need to re-upload the same media, just find them in your library.
#### Send Card
#### 
Card is used to display a serious of information nicely like product information. There are 4 factors in a card, picture, title, subtitle and button.
TIP: Please note that to show a card, you must have a title and at least one other factor, picture, subtitle or button.
#### Send "For Each"
This message type is also showing cards but in a more automatic way. With "For Each", you don't need to type in each card yourself. It automatically displays all items in a JSON variable. Check [Action Step - JSON Operation](https://www.google.com/url?q=http://gochat.gohyppo.io\&sa=D\&source=editors\&ust=1740386900436581\&usg=AOvVaw2dNv408KLLgM4SU1YHFCpc) if you have no idea about what is JSON variable.

1. choose a JSON variable first
2. click "\" or type "{{" in the text box
3. choose "ITEM" to get a sample item from the JSON variable
Value in the JSON variable:

Value in "ITEM":

The "Sample data" is to quickly fill in the "JSON Path" field. For example, as shown in the picture, click the "price" row, and "$.price" appears in the "JSON Path" itself. This means that, we are displaying the price of each item here. If there is no sample data prompted, you can fill in the path yourself by typing "$.", which refers to each item in the JSON variable, followed by the key of a value.
#### Value Format
Moreover, for numbers like percentage and price, for date value and time value, GoChat has different formats listed for you. For example, in the above picture, the price value is "5" and after choosing a "F03" format, the bot will display it as "$5". While the value in the variable is still the number "5" so that you are able to use it in math calculation or condition comparison without malfunction.
#### Hidden Keys
Great! Now you see how to use the "For Each". Apart from the keys in the JSON variable, there are 3 hidden key you might need:

Key Name, Description
* INDEX: index of the item started from 1
* KEY: key name of the item
* VALUE: value of the item = the item itself
**INDEX Example**
When you have a JSON with a list of JSONs in it, use INDEX for checking the sequence number of an item. Let's add an index number before the item name:

Testing result:

**KEY/VALUE Example**
When you have a JSON as shown in the following picture instead of a JSON holding a list of JSONs,

These are what you will get by using the three keys:


Testing result:

#### Send SELECT after "For Each"
When you add a button to your "For Each", the button is going to show with every card. Usually, you might want to put a "Buy" or "Select" button here in the case that you are listing some products or options.
How does the the bot know that which card did the user select?

When you select next step for the button, choose "Select":

Then select a next step as you usually do, like a Send Message Step to show the selected item or Action Step to deal with the data. You can then access the selected item in "SELECT":

For example, let's add a Send Message step, find the system field "SELECT":

1. click the row "item" to get the path "$.item" or type in the path directly
2. in the JSON path, add key name if needed. In this case, let's show the name of the selected item. So add ".name" after the path.


You will see this when you test it:

#### Send Dynamic Content
Dynamic Content helps you send out an API request, to your server or a third-party server, in order to get a response to display. The server can reply differently each time. In this way, your bot is able to display dynamic content to your users.
This feature is practical when your bot logic is complex and rely heavily on other servers. For example, you have your own AI algorithm to analyze users' questions and calculate corresponding response on your server, in this case, you can send the question in the API request. And the server can generate a response based on the question. Finally, the server send the response back to GoChat to display to your users.
A response message can contain several messages, buttons and quick replies with actions. You can even apply simple actions like add tag directly in the response JSON.
* Check [Action Step - External Request](https://www.google.com/url?q=http://gochat.gohyppo.io\&sa=D\&source=editors\&ust=1740386900441874\&usg=AOvVaw1cYQJxWYVZqjIEHeiJQsIK) for how to send an API request,
* and [Response Format](https://www.google.com/url?q=http://gochat.gohyppo.io\&sa=D\&source=editors\&ust=1740386900442181\&usg=AOvVaw3zfTkLvJGXBaLKmvulAjgK) for message formatting guidance.
#### Send Location
#### 
To send a location, search it on a map, then right-click it to copy its latitude and longitude values:

Enter your location name, paste the data and add a label if needed. A label gives additional information like floor or room number.

#### Send Ecommerce Product
Check [Ecommerce](https://www.google.com/url?q=http://gochat.gohyppo.io\&sa=D\&source=editors\&ust=1740386900443091\&usg=AOvVaw0_FJilkT-6PnEB3bOSsJ1J) for how to setup and use built-in ecommerce system.
#### Facebook - Send Message
Facebook allows the bot to send texts with 3 buttons and 10 quick replies at most.
#### Send Text with Button & Quick Reply

The difference between button and quick reply on Facebook Messenger:
Type
Usage
button
once sent, always in the conversation to be pressed
quick reply
similar to button, but disappear when used
Try to add some buttons, quick replies and test it. You will see their differences.
#### Telegram - Send Message
Telegram flow is our newly added flow type. It is similar to Facebook flow except for some exclusive features with Facebook. Please check Facebook flow for guidance for now. Text tutorial about Telegram flow will be updated shortly.
#### WeChat - Send Message
WeChat allows the bot to send texts with 10 buttons at most. Message type with WeChat:

#### Send Article

This is how it looks like in the chat:

#### Send Mini Program
You can also send mini-programs that associates with your official account.

#### WhatsApp - Send Message
Message types with WhatsApp:

Button in WhatsApp is a bit different from that in Facebook. A button in Facebook can be pressed for multiple times while in WhatsApp, only once.
#### SMS - Send Message
SMS bot can send only text and image.

#### Voice - Send Message
#### Send Text / Audio

You can have the bot read out the text with a specified language or record your own audio and upload it.
For voice bot, you can set a default language at the Green Start Point or set it separately for each send message/question step.
GoChat has built a Mini-App called "VoiceMaker" using a third party API which provides you with a better quality of text-to-voice conversion! Download the Mini-App in integration section. The documentation about "VoiceMaker" is in progress.
#### Google My Business - Send Message
Message types with Google my business flow:

All types are covered above, please check message type in common for all/some of the channels. Find location type in "Rich Media".
### Question Step
### 
#### Set Quick Answers
Quick answers are convenient for users to click rather than typing. When you set quick answer:

"Answer Text" is shown to users while "Answer Value" is saved to the variable.
TIP: You can set quick answers across all channels. However, some channels display the quick answers as buttons for pressing like Facebook, while some don't such as SMS. For the latter case, you can still set quick answers but at the same time, you will need to prompt that how to trigger the quick answers.
#### How to give prompt and set quick answers?
In th question box, for example, put "reply 1 for service A, reply 2 for service B", etc. Then in the quick answer, set "Answer Text" to be "1", "2", etc for matching, and "Answer Value" to be "service A", "service B", etc to save user's option.
How to Provide Quick Answers
* Facebook: quick answers will be displayed as buttons
* Telegram: quick answers will be displayed as buttons
* WhatsApp: quick answers will show in "Select Option"
* SMS: give prompt
* Voice: give prompt and use Speech question or DTMF question to ask for keypad/voice input
* Google: quick answers will be displayed as buttons
#### How does the matching work in quick answers?

Once the user's input contains one of the "Answer Text", the quick answer is matched (non case-sensitive). Plus, the order of those quick answers matters because the bot will check in order. Once a quick answer matched, it will stop the matching.


#### Skip Button
Add skip button if the question is ok to skip. Also, the label of the skip button is editable.
#### No Match
#### 
"No Match" is a very practical feature because different answer types have different specified patterns. Email address, for example, has to be "". You can put something like "Wrong email, please try again" as your retry message and jump to another step if no match on several times.
However, a "" format just filters out wrong email but fake email. To check whether an email is real or not, try Mini-App for using a third-party verification tool.
#### No Input
Similarly, "No Input" helps you redirect the flow when user input expires. By default, a question expires in 1 hour. Make it shorter if needed.

#### Ask for Image / Audio / Video / File / Record
#### 
Note: you will need text variables to save the URL links of these 5 types of answers
When the user uploads a document, an URL link pointing to the document is saved in the variable rather than the document itself. Because media document can be very large. Later, if you want to send that document in send message step, you will need to choose "Send Media From URL" and type in the variable there.

#### Ask for Choice
This is a question type listing limited quick answers and user have to choose only from these quick answers. For example, when choosing property type, list only house, townhouse and apartment as quick answers. Therefore, if the user doesn't click one of these three, a retry message appears.
#### Ask for Date / Datetime
Note that
Except from Facebook Messenger and Google My Business, the rest channel doesn't have a date picker when user makes Date/Datetime input. So you have to prompt users "Please input the Date / Datetime as exactly the format: YYYY-MM-DD / YYYY-MM-DD hh:mm:ss". Any other format won't be recognized successfully.
#### Ask for Phone
The basic validation for Phone number Question is:
* only these 11 characters are allowed: 0, 1, 2, 3, 4, 5, 6, 7, 8, 9, +.
* "+" sign is only allowed in the front of the phone
* more than 6 characters
#### Question Step in Voice Bot
#### 
TIP: You can always put a URL link pointing to your mp3 file in the text box (started with "https\://" and ended with ".mp3" or ".mav") of a Send Message Step or Question Step. In that way, the bot will play the audio file instead of transferring the text to audio.
TIP: You can put the link directly in the text box or store the link in a text variable. You can also combine audio URL with text when you use it. But remember that don't let the URL and text connect to each other, because the system cannot recognize it as an audio URL link. See screenshot below.

#### Voice Bot - Ask for Speech
Speech is usually used to get short answers. When the bot asks for speech input, it will listen to what the user says and convert the speech to text with a confidence score. The score is between 0 and 1. The closer to 1, the more confident the speech analysis was.
TIP: You might want to add a Condition step to discard any conversion with low confidence. For example, when the confidence score is less than 0.7, ask for re-input.
Use "Advanced Settings" to help improve the conversion:

Select correspond speech model and language. "Numbers and Commands" speech mode can help improve the recognition rate when the answer is a string of numbers, etc. Please note that, Twilio charges for using this mode. More importantly, provide the bot with some hints, keywords that might appear in speech (separated by commas and no space).
#### Voice Bot - Ask for DTMF (Keypad)
DTMF refers to keypad input, including number 0 to 9, \* and #. Usually, it is used to make a main menu for your voice bot, just like what you might hear before "Hi, press 1 for xxx, press 2 for xxx, ..."

"Number of Digits" means how many digits to expect. For example, a credit card number needs 14 or 16 digits while a postcode needs 4 or 6 digits.
"Stop Key" is set to "#" by default, but it is also editable. You will need "Stop Key" when you don't know how many digits to expect. Don't forget to mention the "Stop Key" in the question box. 🤖🤖
TIP: "No Input" timeout in Voice Question plays an important role. Often, it will be set to just few seconds while in other channels, the default timeout is 1 hours.
#### Voice Bot - Ask for Record
#### 
Again, same as asking for picture, audio, video or file, you will need a text variable to save the URL link of the record file. Check advanced settings for more details such as "Stop Key" and "Max Record Duration".
You will be able to access the record file through the URL link or manually from the "Recordings" section shown as below:

Here you can see all your "Record Question" and "Transfer" recordings with a "Play" button to play the audio.
#### Voice Bot - Ask for Transfer
The transfer feature is more like an Action rather than a Question. Since actions in the Action step are shared across all the channels, we put transfers in Question steps.

TIP: The transfer number should be in E164 format. e.g. +61412345678
You can record the conversation after transferring for training purposes, etc. Similarly, check the recording from the "Recordings" section from the left sidebar.
#### Hang up Calls
One thing to mention, if your clients need to come back to the bot after the transferred conversation. There are 2 ways to do so:
* the transferred party hang up first
* your clients press the star key (need to enable the option in advanced settings)
In either way, don't forget to mention it to your clients before the transfer.
#### Add Extension to Phone Number
Add extension to a phone number by using a hash key. e.g. +61412345678#wwww1234. Each "w" will wait for half a second.
Let say I have a voice bot for the number +61412345678, and I put a DTMF question after the Start point of the main flow. The extension "1234" will be considered as the input for this DTMF question. In this way, you are routing the calls automatically.
#### Transfer to Multiple Numbers
You can put multiple numbers in the "Transfer To Phone Number" field, separated by ONLY commas. e.g. +61412345678,+61412345679#wwww1234,+61412345670
The bot will call these 3 numbers simultaneously, the first person who answers the call get this transfer, the rest call stops ringing. Your phone number provider will only charge you for one call because only one number is transferred successfully.
#### Voice Bot - Ask for Payment
The payment feature is more like an Action rather than a Question.


#### PCI Mode (Twilio)
For Twilio users, you will need to enable the PCI mode in your Twilio account to capture a payment either in test or live mode.
Search "Voice Settings" from your account,

click the "Enable" button:

#### Edit Prompts
All prompts are already set in English. Feel free to change it if needed like changing to another language. There are 4 pieces of information to gather for a card.
1. credit card number
2. expiration date
3. CVV
4. postcode (if needed, enable the option in advanced settings).
Each information has 3 speeches to set, asking, timeout and invalid:

#### Payment Connector
To get a "Payment Connector", which is "Unique connector ID", you will need to access your phone number provider and payment service provider. Twilio and Stripe, for example, go [twilio.com](https://www.google.com/url?q=http://gochat.gohyppo.io\&sa=D\&source=editors\&ust=1740386900461274\&usg=AOvVaw17_kSCYM3UtDjT_-ti0XNS)
[(opens new window)](https://www.google.com/url?q=http://gochat.gohyppo.io\&sa=D\&source=editors\&ust=1740386900461577\&usg=AOvVaw0b4AB7aEaMgp1HDGPVMkhs)
, follow step 1 to 4 in the following 2 pictures:
 

Install, name a "UNIQUE NAME" yourself and click "Connect with Stripe". This "UNIQUE NAME" is then your "Unique connector ID", copy it back to GoChat.

TIP: Note that for "MODE", choose "test" when you are testing the payment process and choose "live" when you are ready to accept real payment.
#### Charge Amount
Put a direct number like "99.99" or a number variable here.
#### Response

You will need a JSON variable to hold the payment result. This is a response example including some card details, confirmation code and payment result.
#### Payment Fail
You can deal with the situation via the "Payment Fail" option. For example, send "Something went wrong" and goto the Payment Step again.
#### One Time Token
You can choose to capture a payment right now or later.
* If you decide to charge right away:
give a value more than 0 in the "Charge Amount" box
* If you wanted to get the payment later
put a "0" in the "Charge Amount" box. In this way, you will get a token for future capture.
Note
There are 2 types of token, one-time token and reusable token. With a one-time token, you can charge the client once. While with a reusable token, you can charge the client for multiple times.
Under the situation that you set the charge amount to "0", if you enable the "One Time Token" option in advanced settings, you will get a one-time token. Otherwise you get a reusable token.
By different combinations of charge amount and "One Time Token" option, you will get different payment results:
Charge Amount
One Time Token
What Will Happen
Payment Result
0
Enabled
get one-time token

\> 0, e.g. 5
Enabled
charge $5

0
Disabled
get reusable token

\> 0, e.g. 5
Disabled
charge $5

That means, whenever you set a charge amount greater than 0, it doesn't matter whether you enable the One Time Token option or not, you will charge your client right away and get a payment confirmation code. The code starts with "ch\_" if you are using Twilio.
On the other hand, an one-time token starts with "tok\_" if you are using Twilio. And a reusable token refers to customer's ID, starting with "cus\_" if you are using Stripe.
#### How to Charge with Token
Check the documentation of how to create a charge with your payment service provider. Let's take Stipe as an example, to make a payment with a reusable token.

In the example, a post request is sent to Stripe with a testing API key and a charge amount, currency and the reusable token, i.e. the customer ID.

After hitting the test button, this is the response if succeed:

In the response you can see there is an id started with "ch\_", which is the payment confirmation code. That means, you've successfully made a payment.
#### Description
"Description" is submitted along with the payment details. For example, you can put “Payment of $20.52 submitted from Phone Number (xxx)-xxx-xxxx” to create a record to show which call created the payment.
#### A Credit Card for Testing
Use the following card details for testing if needed:
Credit card number: 4242 4242 4242 4242
Expiry date (MM/YY): 12 25 (pick a date in the future)
Zip code: 94105
CVC security code: 333
### Action Step - Variable Operation
GoChat provides you with various built-in operations for variable modification.
There are 6 types of variable in GoChat:
| Type | Storage | Example | Operation |
| -------- | ---------------------------- | --------------------------- | ------------------------------------------------------------------------- |
| Text | letters, words, sentences... | Hi, GoChat. | cutting, change case, encode, decode... |
| Number | number | 123.45 | + - x ÷, mod, power, log, root, round... |
| Boolean | either "yes" or "no" | yes | assign |
| Date | date | 2021-03-30 | format, add months/weeks/days |
| DateTime | date and time | 2021-03-30 16:52:00 | format, add months/weeks/days/hours/minutes |
| JSON | a series of variables | {"name":"jack", "age":"10"} | load, get, update, remove, count, sum, average, sort, shuffle, reverse... |

Click "Basic Actions" in the Action step and here are the "Set Variable Value" and "Clear Variable Value".
#### Clear Custom Field / Clear JSON
To clear text, number, boolean, date, datetime variable, please use the Clear Custom Field action.
To clear JSON variable, please use the Remove All Items operation in the JSON Operation.
#### input value
"input value" operation is used to assign value to a variable. This operation works for any variable type.
TIP: "input value" for text variable can be used to connect several text variables. See the below picture for where to put original value and operated value.

#### Math Formula

With this operation, you can now do formula calculation directly in the Action Step - "Set Variable Value" and Condition Step - "Value".
Math operations and function supported:
+, -, \*, e, pi, PI, abs(), min(), max(), ceil(), floor(), log(), pow(), round(), sqrt(), sin(), cos(), tan()
Please note that
If the formula is invalid, the system will return 0 to number variable and empty to text variable.
#### Set Text Variable
#### trim text
| Description | e.g. Before | e.g. After |
| -------------------------------------- | ----------- | ---------- |
| remove spaces before or after the text | " abc" | "abc" |

#### sub string
| Description | e.g. Before | e.g. After |
| -------------------- | ------------- | ---------- |
| get part of the text | "Hi, GoChat!" | "GoChat" |

Note
Index starts from 0. Every character counts including space and punctuation.

#### replace string / replace string case sensitive
| Description | e.g. Before | e.g. After |
| ------------------------ | ------------- | ---------------- |
| replace part of the text | "Hi, GoChat!" | "Hello, GoChat!" |

Note
In case sensitive situation, you have to put exactly "Hi" rather than "hi", "HI" or "hI".

#### to lower / upper case
| Type | e.g. Before | e.g. After |
| ------------- | ------------- | ------------- |
| to lower case | "Hi, GoChat!" | "hi, GoChat!" |
| to upper case | "Hi, GoChat!" | "HI, GoChat!" |

#### generate random text
| Description | e.g. Before | e.g. After |
| ----------- | ---------------------- | ---------------------- |
| as the name | "code: XXXX-####-xxxx" | "code: UBWT-3657-lkzb" |

This feature is useful when you need to generate one-time verification code or reference code.
#### url encode / decode
| Type | e.g. Before | e.g. After |
| ------ | ----------------- | ----------------- |
| encode | "Hi, GoChat!" | "Hi%2C%20GoChat!" |
| decode | "Hi%2C%20GoChat!" | "Hi, GoChat!" |
"Hi%2C%20GoChat!"
"Hi, GoChat!"

#### base64 encode / decode
| Description | e.g. Before | e.g. After |
| ----------- | ------------------ | ------------------ |
| encode | "Hi, GoChat!" | "SGksIFVDaGF0IQ==" |
| decode | "SGksIFVDaGF0IQ==" | "Hi, GoChat!" |

#### to URL friendly slug
| Description | e.g. Before | e.g. After |
| ----------------------------------------------------- | ----------------- | ---------------- |
| replace spaces with hyphens and remove the rest signs | "it's a good day" | "its-a-good-day" |

#### get text before/after ...
| Type | e.g. Before | e.g. After |
| ------------------------------------------ | ----------------------------- | ----------------------- |
| get text before another text | name: GoChat, city: Melbourne | name |
| get text before last occur of another text | name: GoChat, city: Melbourne | name: GoChat, city |
| get text after another text | name: GoChat, city: Melbourne | GoChat, city: Melbourne |
| get text after last occur of another text | name: GoChat, city: Melbourne | Melbourne |

#### Set Number Variable
#### get text length
| Description | e.g. Before | e.g. After |
| ----------- | ----------- | ---------- |
| as the name | 500.59 | 6 |

#### generate random number
| Description | e.g. Before | e.g. After |
| ----------- | ----------- | ---------- |
| as the name | n/a | 56 |

#### add / subtract / multiply / divide / modulus / power / natural logarithm / square root
| Description | e.g. Before | e.g. After |
| ----------- | ----------- | ---------- |
| as the name | 7 | 8 |

TIP
in "natural logarithm", when you are calculating log2(8) = ? put 8 as "Value" and 2 as "Number".
#### round
| Description | e.g. Before | e.g. After |
| ----------- | ----------- | ---------- |
| as the name | 7.8693 | 7.87 |

#### floor / ceil
| Type | e.g. Before | e.g. After |
| ----- | ----------- | ---------- |
| floor | 6.55 | 6 |
| ceil | 6.55 | 7 |

#### Set DateTime Variable
#### from formatted text
| Description | e.g. Before | e.g. After |
| -------------------------------------- | ----------------------- | ------------------- |
| get DataTime value from formatted text | 00:00:00 30th Aug, 2020 | 2020-08-30 00:00:00 |

#### add minutes / hours / days / weeks / months
| Description | e.g. Before | e.g. After |
| ----------- | ------------------- | ------------------- |
| as the name | 2021-01-01 00:00:00 | 2021-01-01 00:01:00 |

### Action Step - JSON Operation
JSON is also a type of variable. It is used to store and manage a series of variables including normal varialbe and JSON variable.
For example, this is a JSON storing a customer's detail:

Check this [tutorial video](https://www.google.com/url?q=http://gochat.gohyppo.io\&sa=D\&source=editors\&ust=1740386900514912\&usg=AOvVaw2QPMiYKbc4v5wWdydwksLA)
[(opens new window)](https://www.google.com/url?q=http://gochat.gohyppo.io\&sa=D\&source=editors\&ust=1740386900515224\&usg=AOvVaw3hQ-iNnKaWmopOOfQzDzzN)
about how to write JSON variable.

The "JSON Operation" is sitting in the "Basic Actions" list of the Action step.
TIP: Various examples have been already embedded in the operation. Select an operation and use the "Examples" button to explore it!

For example, how to insert an item to a JSON variable:

### Action Step - Delete bot user

You can delete a bot users. This is specially useful to keep your bot users limits controlled. It is possible to broadcast a flow manually when you are close to the limit.
### Action Step - External Request
With external requests, you can call APIs from other third parties or your own server to request data, submit data and etc.

In an Action step, find "External Request" in "Advance Actions" and click "Add your request" then start editing it:

1. choose a request type such as GET, POST, etc
2. paste your request URL / endpoint
3. adjust "URL parameters", "Headers", "Body" or "Authorization" section if needed. e.g. setup API key
4. click "Test" and area 5 will show in the "Response" section with a response code
5. click on "Response Headers" to expand the header for more details and the received data is in blue
6. choose which part of the data you need by clicking the circle on the left-side accordingly
7. after clicking area 6, the JSON path for the selected data is automatically shown here. $ means the whole JSON.
8. choose which custom field to store the data. You can create a new field here by typing in a field name and clicking it in the drop-down. Click the "Add" button to add to the mapping list
9. finally, the mapping shows in area 9. Add as many mapping as needed and click "Save".
Testing Value
Make sure you provide testing data for any one of the fields/variables in the settings before you use the Test button.
#### URL Params
#### 
In the above screenshot, we can see that there is a URL parameter in the endpoint called "user\_name". Remember to copy the endpoint down and provide a testing value.
Alternatively, you can use the URL Params sections for the same result.
#### Headers
#### 
Same as URL Params, put your key name first, then insert the variable and provide a testing value.
#### Authorization
#### 
Alternatively, put the token in the Authorization section. It's going to be less error-prone (sometimes people just forgot the "Bear " in front of the token).
Moreover, for Basic Auth, simply put your username and password value and the system will do the base64 encoding for you.
#### Body
To include a file itself in the parameters, use multipart/form-data:

x-www-for-urlencoded works just like URL Params or Headers section.
Instead of listing all the payloads in x-www-form-urlencoded, you can also paste the example payload in raw JSON:

On the left-hand side, Body Content, paste or write your JSON first, when you insert a variable, the Test body content shows on the right side immediately. It's to specify a testing JSON value.
Click on Copy from body content to copy the whole JSON structure. All the variables will be replaced by {{variable\_name}}. Remove the placeholder and put your testing values.
#### Testing
Once you are ready, click on the Test button next to the URL endpoint or in the Response section.

Besides the tips about how to map data above, you might also want to save the values in the response header for later use. Simply expand the header, click on a value in the header and the JSON path to it shows automatically there.
### Action Step - Send Notification
This action allows your bot to send notification through various channels, including
* Email
* Slack
* SMS
* Phone Call

It's all in the "Notification" of your Action step.
#### Email Notification
To send an email notification, you will need to setup your email integration first. Check [how to setup email integration](https://www.google.com/url?q=http://gochat.gohyppo.io\&sa=D\&source=editors\&ust=1740386900520677\&usg=AOvVaw1P0FgdNL6sGMZx2WoBKx7y)?

Unlike "Send Email" step, email notification only supports text message type. Check "Send Email" step in "Email Integration" page if you need more message types like images, buttons, files, etc.
Put the sender's address at "Email Profile" and the receiver's address at "To Email".
#### Slack Notification
Similarly, to send a slack notification, you will need to setup your slack integration first. Check [how to setup slack ingegration](https://www.google.com/url?q=http://gochat.gohyppo.io\&sa=D\&source=editors\&ust=1740386900521523\&usg=AOvVaw1hwwROhgcEMw3W1SZlXi0R)?

In the pop-up window,
1. choose a Webhook
2. choose a default channel or name another one
3. pick a message type, add as many as needed
4. for example, "Section" type, put your message at area 4 and add photo or field value if needed
5. use the "Test" button to send the message for test and adjust accordingly
6. once finished, click "Save".
#### SMS Notification
Setup a sender number before you make a SMS notification. Check how to [add phone number](https://www.google.com/url?q=http://gochat.gohyppo.io\&sa=D\&source=editors\&ust=1740386900522651\&usg=AOvVaw0USrQlctH2m3Q6w0LQZSo9)?

You can use the "generate random text" operation with text variable to get a random security code and send out for verification purpose shown in the pictures.

Choose a sender and receiver, put message and here you go!
#### Make Phone Call
Same as SMS notification, a phone number is needed to make a phone call. Check how to [add phone number](https://www.google.com/url?q=http://gochat.gohyppo.io\&sa=D\&source=editors\&ust=1740386900523136\&usg=AOvVaw3zymTGghWNlQOW3bcptx1C)?
Moreover, you must make a voice flow connected to this phone number otherwise your voice bot don't know what to say.

#### Ref Payload
Ref payload is used to passing on a message to the voice bot.
For example, set the payload to "support" here in the notification action and in your voice flow:

Goto the Start Step in your Main Flow and save the ref payload in a custom field.
TIP
You are allow to pass on a JSON variable in the ref payload but base64 encode and decode are needed before and after this. See base64 operations in Set Custom Field.
### Condition Step
With Condition step, you can go to different steps/sub flows depends on conditions.

In your Condition step, click on "+ Add Condition Group" to set at least one condition group. "Otherwise" group is always there.
You can make as many condition groups as you need. The matching start from the top to the bottom, once a group matched, the system goes to a named step. When it fails to match all condition group, the "Otherwise" group will take over it. So it's always a good practice to name a step in the "Otherwise" group even it is very unlikely to be used.

Another important thing to know is the difference between "All conditions" and "Any conditions". It is sitting at the upper right corner of each condition group.
You can list more than 1 condition in a condition group. When you do, it matters whether you choose "All" or "Any".
"All Condition" means to get this group matched, you will need to have all the conditions matched in the group.

However, to get a group with "Any Condition" matched, you only need to have one of the conditions matched.

#### Tag & Sequence Condition
#### 
For tag and sequence condition, you can choose "in" or "not in" from the "Operator". Choosing multiple tags/sequences is allowed.
#### Text Variable Condition
#### 
These are all the operators for text condition.
For "has any value" and "is empty" of all variable types, when you clear a variable, the variable becomes empty. Thus, "has any value" is false and "is empty" is true for this variable.
#### Number Variable Condition
#### 
These are all the operators for number condition.
#### DataTime Variable Condition
#### 
These are all the operators for DateTime condition.
Note that you will need to put "value" always as the correct format "yyyy-MM-dd HH:mm:ss" no matter which displayed format you choose for that variable.
Please note that
"before/after" is different from "time before/after". The former compare the whole datetime value while the latter only compare the time value.
#### JSON Variable Condition
#### 
These are all the operators for JSON condition.
Note
The very last 3 operators, "has item matched with ...", require the JSON to be a list of variables, not a list of JSON. In other words, if your JSON is storing a list of normal variables, these 3 operators work. They won't work for a JSON storing a list of JSON.
#### Custom Input
Custom input is built for compare values in JSON variable. Search "custom input" in the if field:

Pick a value from a JSON, then you can compare it as you use the text variable condition.
#### Math Formula
#### 
With this operation, you can now do formula calculation directly in the Action Step - "Set Variable Value" and Condition Step - "Value".
Math operations and function supported:
+, -, \*, e, pi, PI, abs(), min(), max(), ceil(), floor(), log(), pow(), round(), sqrt(), sin(), cos(), tan()
Please note that
If the formula is invalid, the system will return 0 to number variable and empty to text variable.
### Split Step
With Split step, you can go to different steps/flows depends on probability.
Split step can be used to build many interesting functions, like
* changing speeches rather than same responses all the time
* testing your new functions with just a small group of clients to get feedback
* or making a fun lottery!

In your Split step,
1. click "+ New Variation", add more than 2 variations
2. change variation title if needed
3. adjust weights as you want
* directly put percentage numbers like 30 and 70 then you will get 30% and 70%
* alternatively, put weights like 1 and 2 and let the system calculates the percentages 33% and 67% for you
4. select next steps for each variation
5. save the picked variation for later use if needed
#### Usage Examples
Changing Speeches:

Testing new Functions & Get Feedback:

Fun Lottery:

### Goto Step
"Goto Step" helps you jump to another step in the current subflow or jump to the start point of another subflow.

Create new subflow directly, or choose an existing one. You can only jump to a step in the current subflow.

Goto Step is going to make your flow look more organized and clear to understand.
Before using Goto:

After using Goto:

## Canvas
Canvas helps with step organization.
We've learned that to move the workspace, click and drag the workspace. For selecting multiple steps, it's a bit similar. Hold the Shift key then click and drag to cover the steps you would like to select:

Alternatively, ctrl + click them one by one:

TIP
If the edit panel didn't show, ctrl + click one of the green steps twice to de-select it and re-select it again. The panel should show.
After selecting multiple steps, click "Create New Canvas" to organize these steps in a canvas box.

Click the title of the canvas to edit canvas's title or add a description. Minimize the canvas by clicking the "-" button on the left side of the canvas title.
Note
You will need to select at least 2 steps to create a canvas or move them to other sub flows. So if you have only 1 step to move or put in a canvas, try adding a temporary step to help and discard it after that.
Finally, to add and remove steps from an existing canvas, simply select a step or multiple steps, then drag them into or out of the canvas:

When you move steps into the canvas, the background color of the canvas changes, release steps when it turns grey from white.
## Sub Flow
Same as "Canvas", "Sub Flow" can also help with step organization. "Canvas" organizes steps in a specific subflow while "Sub Flow" organizes steps in the whole chatbot/flow.
#### Create Sub Flow
#### 
IGo "Flows" from the sidebar, click "+ New Sub Flow", choose a flow type, give a name and save.
Flow Type
Description
Normal Subflow
Varies in channels, basic subflow
Workflow
work at the backend without influencing the front end task
Function Flow
perform repetitive tasks

Click on the subflow to enter and start editing it. For more operations, click on the 3-dots icon. The Sub Flow Ns is a unique subflow ID in the chatbot.
Folders are used to organize subflows.
#### Move Steps to Sub Flow
To move a step or multiple steps to another subflow, select the steps first, then you can either
* use the Move to Subflow button in the editing pannel, or
* copy and paste them
To select multiple steps, hold the Shift key, click and drag to cover the steps.

Alternatively, hold ctrl key and click steps one by one:

After selecting multiple steps, editing panel shows. "Select sub flow", then click "Move to sub flow".
Note
You will need to select at least 2 steps to create a canvas or move them to other sub flows. So if you have only 1 step to move or put in a canvas, try adding a temporary step to help and discard it after that.

Note
If you find yourself unable to click "Move to sub flow" after choosing a sub flow, perhaps you included the green Start Step in your selection. Because the green start point of any subflow can't be moved to other subflows. You can solve this issue by de-selecting the green start point.
To copy and paste, use Ctrl + C to copy the selected steps, then go to the destination subflow, use Ctrl + V to paste there.
#### Call Sub Flow
After creating subflows, you can then call a subflow via:
* Goto Step
* Keyword
* Sequence
* Broadcast
* Facebook Widget
* Comment Growth Tool
* Triggers
* Live Chat
* Menu Items
* Inbound Webhooks
* [API call](https://www.google.com/url?q=http://gochat.gohyppo.io\&sa=D\&source=editors\&ust=1740386900535682\&usg=AOvVaw0LB3Aczb0OuehzDhNHkNmF)
## Workflow
A workflow can be considered as a backend flow where you can automate tasks such as adding or removing tags, set custom field variables, do external API calls.
This way the conversation you have with the subscriber will not be affected by needing to wait to apply all those actions and the experience is as smooth as possible for that end-user.
#### Create Workflow
To create a workflow just go to the flow overview by selecting Flows from the left-hand menu.
Then press the button + New Sub Flow

Select the workflow flow type then give it a name. Once done press the button Create to start creating your workflow.
Once you create your flow and you end up in the flow builder you will notice that you will have access to fewer blocks than when selecting a regular or function flow.
Available blocks are:
* Action
* Condition
* Split
* Send Email
As mentioned this flow is meant to create a backend flow that you can trigger from any other flow inside your chatbot to handle system tasks like adding tags, set custom fields, but also sending emails.

#### Workflow Example
Let’s take an example of how a workflow can be used.
A user signs up with an email and or phone number and you want to sync this information with your CRM platform of choice.
So soon as you grabbed the credentials from the user you can make an API call using the external request block inside of the action module.
You would also want to tag the user inside the chatbot for completing the onboarding step. After done we send an email notification to an admin that a new lead has been created to follow up on.
A workflow can then look something like this;

If you were to incorporate this into the flow that has the actual conversation it might become an issue as the conversation could be on hold for several seconds or more to finish all these system processes. And you might lose the user as he or she thinks the conversation is done.
#### Trigger Workflow
It is very simple to trigger the above workflow inside of any other flow that you build.
Just insert an action block, go to advanced actions, then choose trigger workflow at the bottom

You can then select any workflow you created. This workflow will then be processed in the backend while the conversation with the user will not be affected and continue without any delay.
## Function Flow
A function flow is a fantastic way of preventing you to create repetitive flows over and over again. Think of when you need ask for emails or phone numbers.
With a function flow you will be able to send the user to that one flow, then once completed the user can continue exactly from the point they left off in the previous flow.
#### Create Function Flow
To create a function flow go to Flows from your left-hand menu, then press the button + New Sub Flow.
Select the Function flow type and name your flow. Once done press the button Create and you will be taken to the flow builder.

#### Function Flow Example
Once inside the flow builder and wanting to insert a new block you will see that you have all the blocks at your disposal just like in a regular flow, and one extra called Output.

This output is what makes this function flow so unique as it gives you the ability to send the user back to the previous flow (if you like) exactly where he or she left off.
Let’s create an example where we ask the user for an email and add an output module to it;

As you can see a simple flow but with the benefit this is the only function of the flow, asking for an email.
#### Call Function Flow
After this flow is finished you can return the user to the previous flow to continue the conversation there if you like.
Let us show you how that could look like;

There are many use cases for function flows so you can get as creative as you like.
#### Multiple Outputs
Multiple Output Steps are supported in your Function Flow.
When you call a Function Flow with multiple outputs, the titles of those outputs will show in the Goto Step and you can handle it accordingly.

## Live Chat
Besides being able to create chatbot automation you can also follow up with your subscribers through our live chat inbox. We have one available for every channel.
You can access the live chat in two ways:
1. Through the main dashboard overview
2. Each individual chatbot channel
#### How to access live chat through the main dashboard
When at your main dashboard overview you will have a tab on the top named Live Chat.

The biggest advantage of this overview is that you can see all the channels you have built chatbots on. So going to live chat from this main dashboard is very easy. Just select the chatbot and the live chat will appear.
#### How to access live chat through a chatbot channel
If you are within any of your channels you can also access the live chat from that channel. Just choose Live Chat and the live chat will open up displaying all of your subscribers inside that chatbot channel.

#### How to use Live chat
Once you select any of your subscribers you will then get to see the live chat in action. Many options and information are present so let us walk you through them.

#### Section 1 displays subscribers(bot users) who interacted with the chatbot
* Click on Inbox to switch between Inbox and Done. When you finish a conversation, move the users to Done.
* Use the Search bar to search a conversation by user name.
* Click on a user to view conversation detail and user profile.
#### Section 2 shows the chat your subscriber has with your chatbot
* On the top of it, click the <= icon to hide Section 1, the user list area.
* Right next to it is the subscriber's profile photo and full name.
* In the upper-right corner, click on the tick icon to move the subscriber to Done.
* And the 3-dots icon offers a Hide message from bot option and Manage Shortcuts option.
Hide message from bot lists messages sent only by the user and agent, helping you get a clearer look at the conversation so that agents don't need to go through too many messages.
Shortcuts help agents make quicker responses to the user's query. You can also manage your shortcuts in Tools - Shortcuts.

* Hover your mouse on a message sent by the bot, click on the little v icon to resend the message or jump to this step in the flow, in case you want to edit anything.
#### Section 3 allows agents to reply to your subscribers
* Write a reply in the blank area.
* Type a slash and keyword to search for a shortcut. Use up and down keys to go through shortcuts, hit the enter key to get the pre-written content.
* On the right side, \ icon is used to call a variable, e.g. First Name of the user. You might also want to call it quicker by typing to left curly braces {{ and searching a field name.
* On the bottom of it, the most left-hand side icon is used to change persona. The default icon refers to the default persona, the chatbot itself. Add persona via Contents - Personas.
* Switch between Reply and Note to change reply mode. When you are in Reply mode, the reply area is in white. The content will be sent to your subscriber directly. When you are in Note mode, the reply area is in yellow. The content will be displayed in the conversation area but in yellow and these notes won't be sent to your users. They are for internal reference only.
* the final 4 icons in the bottom-right corner are for sending emoji faces, media (image, gif, audio, video & file) and subflows. The last icon is to send the message/note. You can hit the enter key instead.
#### Section 4 displays the profile of the subscriber
#### Section 5 shows notes, tags, subscribed sequences, OTN topics and all custom user fields
* Add or remove tags from this overview directly. Very useful when it comes to getting subscribers into lead funnels and such.
* For OTN topics and sequences you can only remove them from the user.
* The same goes for the user fields, you can view, adjust the values or delete them entirely.
#### Sending subflows to users
After you finished a talk with a subscriber you might want to send them to a subflow. This is easily done by pressing the icon. A popup window will then appear where you can select or search for your flow.

Once you select your flow press the blue button named Send Sub Flow and the flow will be sent.
NOTE: Do make sure you have disabled live chat mode before sending the subflow. Otherwise the chatbot will not be able to send the messages inside the flow.

TIP
Whenever agents reply in section 3, you will see the Pause Automation area automatically starts a 30 minutes count down. This means that, the chatbot will stop responding during the time. Agents can add on more time if needed. When time is up, the bot starts to reply again.
## Bot Users (also called just Users)
People who opt-in to your chatbot by interacting with it are considered bot users. These become contacts inside of your chatbot channel and during the course of a single or multiple conversations, the chatbot will be able to gather information about them to give you more insights into your audience.
You can go to your bot users by going to the corresponding section in the left-hand menu once you have logged into one of your chatbots.

From here you will see a list with a complete overview of all users that have interacted with and therefore opted into your chatbot.
#### Filter bot users based on conditions
Once on this overview, you can also quickly segment your users by using the filter option. Once pressed you will be able to use any condition/filter you like.

This gives you the ability to quickly see what tags someone has, or what values a custom user fields are.
An example of a filter could be that you want to know who amongst the bot users has given its email.
Another example could be when a user finishes the initial onboarding flow you tag them as such and you want to be able to see who did this.
#### User information
Once pressing a certain bot user a popup will appear and it will show all the collected bot user details so far.

You will see the following on the left side:
* Name
* Gender
* Language
* Timezone
* Local time
Below the profile image, you will have the ability to either delete the user or download the user data. This will help you become GDPR compliant as users might request this from you.
You will also see the specific channel user id and some date and time information like subscribed, last interaction and such.
If we go with the right side of the user information you will see tabs for:
* Notes
* User tags
* Subscribed Sequences
* OTN Topics
* Custom User fields
Only you press one of the tabs you will be able to view the data collected.
For tags, you will have the most options at your disposal.

You will be able to add tags directly to the user but also remove them as well.
For the topics Subscribed Sequences, OTN Topics you will be able to only remove them from the user.
For Custom User Fields you can either remove or change its value.
#### Importing or creating new users
For the SMS and voice channels, it is also possible to import or create users manually. In the top right, you will have the buttons to do so.

Creating a new user means adding a single user manually whereas Import means you can do this in bulk by means of a CSV file.
#### Delete bot users manually